One of the best aspects about Facebook or Google ads is the fact that anyone can do it! That is, from an accessibility point of view, I mean.
Literally anyone can get a Google AdWords or Facebook Ad account, and therefore, anyone can launch an ad campaign.
Thing is, what the Google and Facebook Ad platform DON’T tell you, are that there are many pitfalls that each platform has, which you will need to avoid, to prevent you wasting money. That is, assuming you want to avoid paying the commonly known term “idiot tax“.
So, we are going to outline the most common mistakes we see advertisers make with Facebook ads, so you can avoid falling into these common traps.
1. No Facebook Pixel Installed
Please, oh please, don’t make this mistake! If you are running ANY kind of paid traffic, you really should install the Facebook pixel on your website. Well, even if you aren’t running ads, you really should install it anyway. But especially if you are already running ads.
What is the Facebook Pixel? It is a bit of code that Facebook give you in your ad account, which you install on your website.
Why do you want to do this? So, you are able to do Remarketing – that is, show ads to all past website visitors. And if you do end up running Facebook ads, you are also able to track conversions plus a whole lot of funky stuff. Just trust me, you want to do this.
Not sure how to do this? You can watch a free video here showing you how to do it: http://greenarrowdigital.com/pixel/
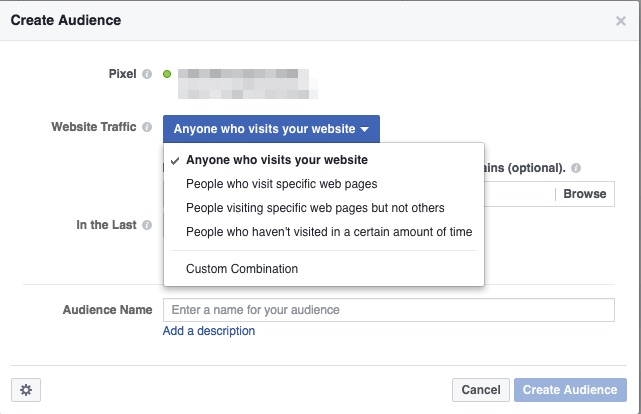
2. Not Segmenting Your Past Visitors
Segmenting people means treating people differently – showing different ads to different people, based on actions they have or haven’t taken.
And the common mistake people make with this is not segmenting their website visitors – i.e. they treat everyone the same. And reality is, someone who visits only your homepage is at a different point to someone who has been to your Add To Cart page, or Contact Page. You should be segmenting people based on pages they have visited (or not visited).
You do this by creating separate lists of people who have done a specific action.
For example,
- A list of people who visited the homepage,
- Another list of people who visited the Add To Cart page or a product page
- Another list of people of people who purchased.
- etc
So, a common segment is to create a separate ‘audience’ (group of people) who have purchased from you already. By isolating these people into their own audience, you can prevent showing these specific people ads in the future. You can also segment by when they were last on your website, as maybe it is not worth showing someone an ad who was only on your website 3 months ago.
Essentially, by segmenting people, you are only spending money on the people who are most likely to buy from you. Or using our example, not someone who has already purchased.
You obviously need to have your pixel installed to be able to do this. So, assuming you have, you can create specific audiences in the Audiences section in your Ads Manager and have a number of options for this.
3. Not Using Lookalike Audiences
This kind of follows on from our previous point about creating segmenting your website visitors and creating audiences. Once you do this, you can then create a ‘Lookalike’ audience.
According to Facebook, “Lookalike Audiences are a way to reach new people who are likely to be interested in your business because they’re similar to customers you care about. You can base your Lookalike Audience on a variety of sources (ex: people who like your Page, or visited your website).“
Lookalike audiences are a great way to find new people who have similar characteristics to whichever audience you are trying to replicate.
An example of what we do in our agency for an eCommerce client is the following:
Step 1: Create many different audiences, based on what page they visited on the website. So, an audience of homepage visitors, another audience of people who visit the ‘shopping cart’ page, and another audience of people who visit the ‘completed purchase’ page.
Step 2: Create a ‘Lookalike’ audience of EACH of those audiences.
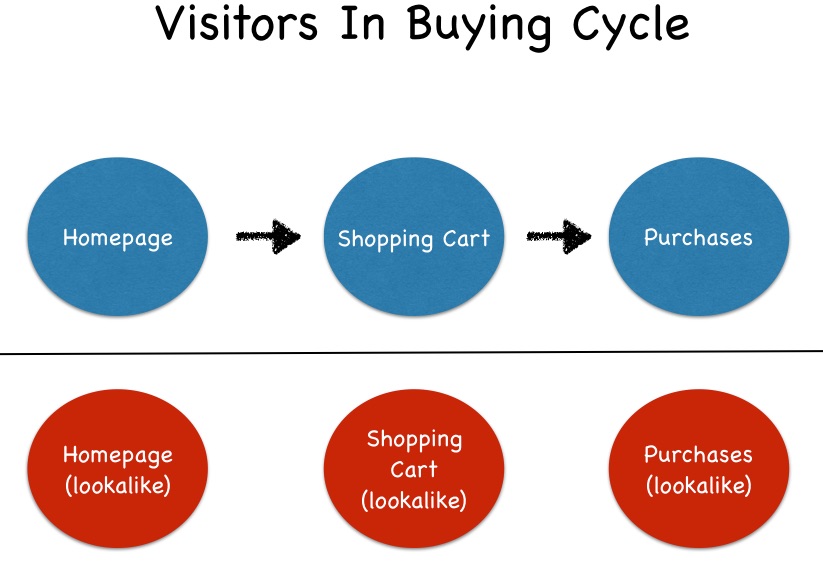
Reason for this, is that as a person goes further down the buying cycle, they are more and more valuable to us. Therefore, we need to tell Facebook, these are my really important people and I would like MORE of them please. But you do need more than 100 people to be able to create a Lookalike audience
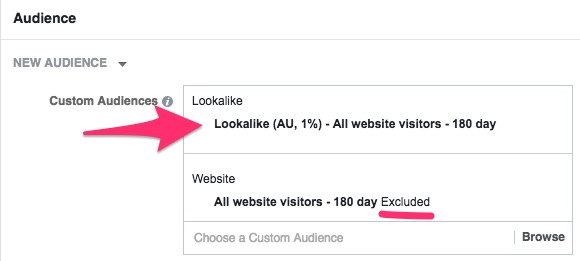
Then, in your campaigns, you can use that Lookalike audience or perhaps all 3 lookalike audiences. For good measure, it might be worth excluding your existing audience, just to be 100% sure there is no overlap.
4. Too Many Interests In 1 Ad Set
No doubt, the best thing about Facebook Ads is their targeting. The ability to show someone an ad who ‘likes’ a specific Facebook page (maybe your competitor’s Facebook page), someone who has a specific job title, or even is a Facebook Page Admin (i.e. they are the admin of a Facebook page). Really, the list of available targeting options is endless. Well, 2500 option to be precise.
But the common mistake that people fall into, is they group all of these interests together, in the 1 ad set.
The problem with this, is that from an analysis perspective, you are unable to see which specific interests are driving your results. And therefore, you are unable to reduce the wasted ad spend, since you don’t know where the wasted ad spend is coming from.
For example, say we have a jar of multicoloured balls and each ball represents a different Interest category. If the best results are coming from the red balls, since the red balls are blended in with all the other colours, we don’t know that the red balls are really driving the results.
Interest targeting is often a classic case of 80/20 — 20% of the interests, drive 80% of the results.
Tip: Put each interest into their own ad set. So, 1 interest per ad set. That way, if a specific interest is not driving conversions, you will know immediately.
5. Grouping All Placements In The One Ad Set
This is one of those sneaky little default settings you need to manually change.
Deciding where your ad will be seen (i.e. placement – desktop or mobile newsfeed, Instagram, Audience Network or right hand column) is assigned at an ad set level. And very sneakily, the default settings it to have your ad in ALL of the available placements.
Now, I’m not suggesting that you shouldn’t test all the possible placements. But you should separate them out into separate ad sets.
So, one ad set may just be for the newsfeed, a different ad set for Instagram, and a different ad set for the right hand column.
Why? Because you will want a different ad for each placement. Plus you will find that they behave differently and then you may not want to spend the same amount of each of those placements.
Doing it our way, you have the most amount of control, which means you have the best control over your ad spend.
So, have a look through your Ad Account and make sure you aren’t making any of the mistakes we mention here. There are a bunch more mistakes we see people make, which will cover in our Facebook training course. You can check it out here: http://greenarrowdigital.com/facebook-ads-masterclass/.
Stay tuned for more updates from us.